How It Works
Introduction
ChatBudgie is an AI-powered chat plugin for WordPress that helps turn your website into an intelligent knowledge base.
Instead of giving visitors generic AI answers, ChatBudgie uses your actual WordPress content to provide more relevant, context-aware responses. It scans your posts and pages, builds a searchable knowledge base, finds the most relevant information when a visitor asks a question, and then uses AI to generate a helpful answer.
The entire workflow is designed to be simple for WordPress site owners. Once the plugin is installed and connected to a SuperBudgie account, ChatBudgie automatically starts indexing your content in the background.
Step 1: Install and Connect ChatBudgie
Getting started with ChatBudgie is simple.
After installing and activating the plugin from the WordPress admin dashboard, you can open the ChatBudgie menu in your admin sidebar. From there, you connect your SuperBudgie account to authenticate your website.
Once connected, ChatBudgie can begin preparing your website content for AI-powered chat. There is no need to manually configure complex AI models, manage multiple API accounts, or build a knowledge base from scratch.
This makes ChatBudgie a practical out-of-the-box solution for WordPress website owners who want a smart chatbot without heavy technical setup.
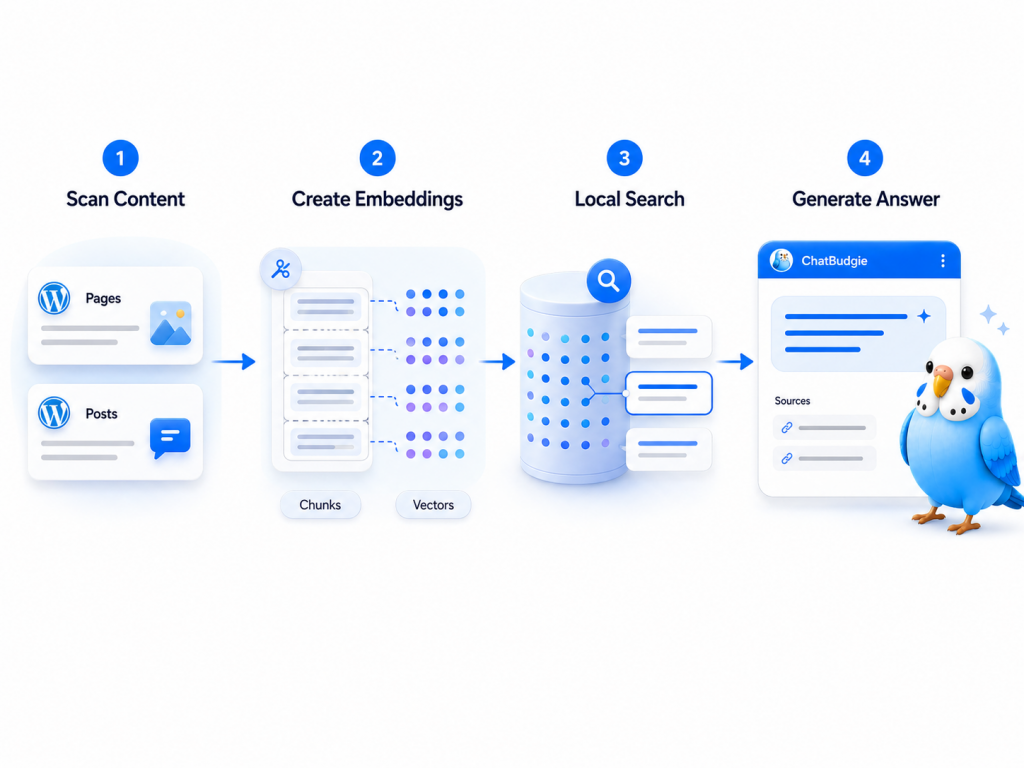
Step 2: ChatBudgie Scans Your WordPress Content
After setup, ChatBudgie scans your WordPress posts and pages.
Your website content is the foundation of the chatbot. Instead of relying only on general AI knowledge, ChatBudgie uses your own public content as the source for answers.
This is especially useful for websites with:
Product pages
Service pages
Blog articles
Documentation
Help center content
Guides and tutorials
Frequently asked questions
Company information
By using your existing content, ChatBudgie helps visitors find answers that are specific to your website.
Step 3: Content Is Broken Into Semantic Chunks
Once ChatBudgie scans your posts and pages, it breaks the content into smaller semantic chunks.
This step is important because long pages are difficult for AI systems to search and understand all at once. By splitting content into meaningful sections, ChatBudgie can retrieve the most relevant pieces of information when a visitor asks a question.
For example, a long documentation page may contain installation instructions, pricing details, customization options, and troubleshooting steps. ChatBudgie can separate these sections so the chatbot can find the right part more accurately.

Step 4: AI Embeddings Are Created
After the content is split into chunks, ChatBudgie uses the SuperBudgie embedding API to transform those chunks into vector embeddings.
Embeddings are numerical representations of meaning. They allow the system to understand the relationship between a visitor’s question and your website content, even when the wording is different.
For example, a visitor may ask, “Can I change the chat icon?” while your website says, “You can upload your own custom icon in Appearance settings.” Embeddings help the chatbot understand that these two pieces of text are related.
This is what makes semantic search more powerful than simple keyword matching.
Step 5: The Vector Index Is Stored Locally
ChatBudgie stores the knowledge base vector index locally on your WordPress server.
This local index allows the plugin to search your website content efficiently when visitors ask questions. It also keeps the searchable knowledge base closely connected to your WordPress site.
Only public website content is indexed, and the vector index is stored in the site’s WordPress uploads directory.
Step 6: Visitors Ask Questions Through the Chat Widget
Once indexing is complete, visitors can interact with the ChatBudgie widget on your website.
They can ask natural questions such as:
“How do I install this plugin?”
“What does this service include?”
“Can I customize the chat bubble?”
“How does token billing work?”
“Does the chatbot use my website content?”
“Where is the knowledge base stored?”
Instead of forcing visitors to browse multiple pages, ChatBudgie gives them a conversational way to explore your site.
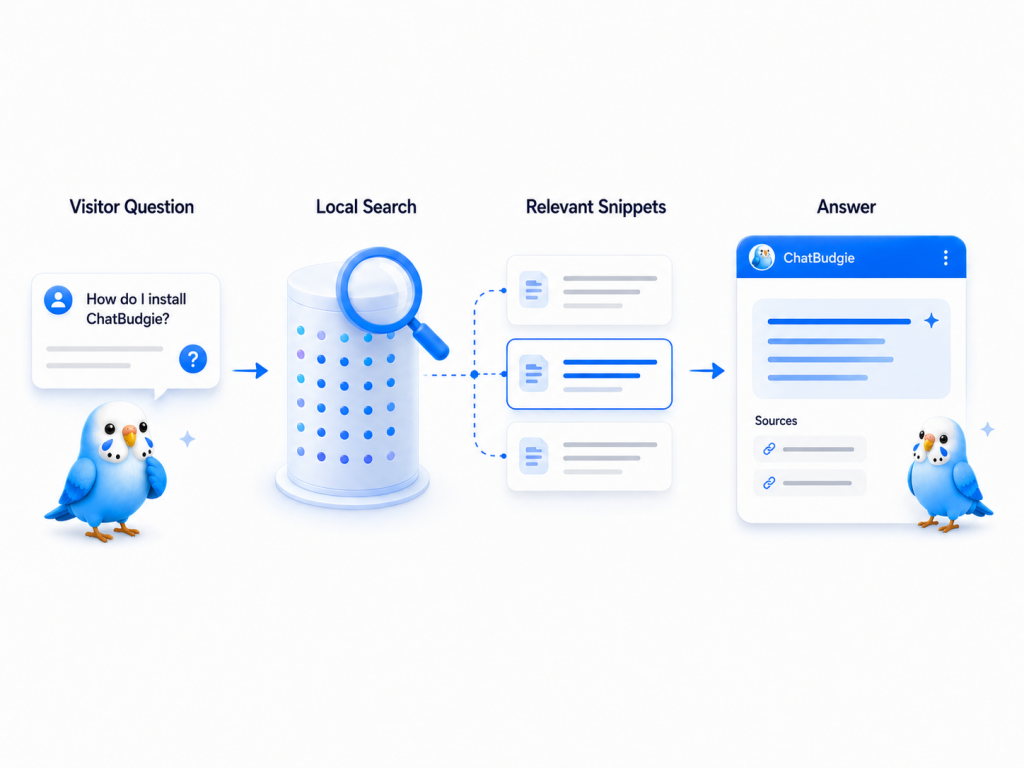
Step 7: ChatBudgie Searches the Local Knowledge Base
When a visitor sends a message, ChatBudgie performs a local vector search.
The plugin compares the visitor’s question with the indexed content and finds the most relevant snippets from your WordPress site. This step is called retrieval.
Retrieval is what allows ChatBudgie to ground its answers in your actual content.
Instead of making unsupported guesses, the chatbot first looks for relevant information from your own website.
Step 8: The Question and Context Are Sent to an AI Model
After the most relevant content snippets are retrieved, ChatBudgie sends the visitor’s question, recent conversation history, and selected context to the SuperBudgie chat service.
The SuperBudgie platform then selects a suitable Large Language Model, such as ChatGPT, Claude, Qwen, or another supported AI model, to generate a natural answer.
This process combines the strength of your website content with the fluency of modern AI models.
Step 9: The Visitor Receives a Helpful, Context-Aware Answer
Finally, the AI model generates a clear, human-like response based on the retrieved website content.
The result is a chatbot that can answer questions in a way that feels natural while still staying grounded in your site’s actual information.
This helps visitors get answers faster, improves content discovery, and can reduce repetitive support questions.
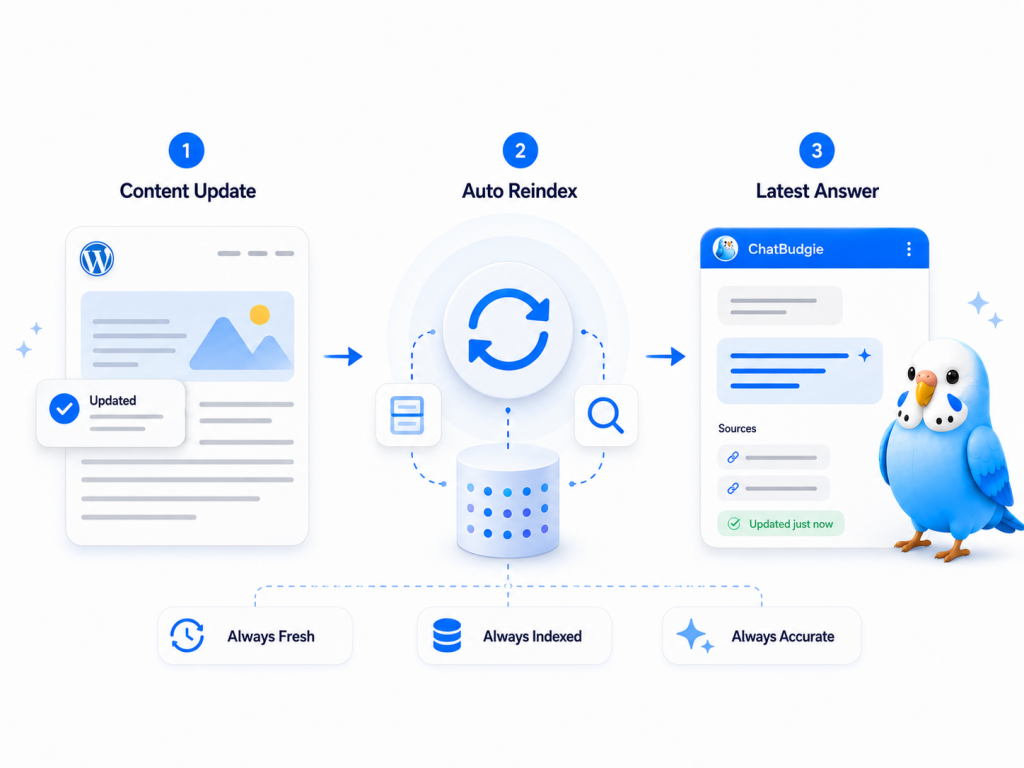
How Auto Indexing Keeps Answers Up to Date
A chatbot is only useful if it reflects your latest content.
ChatBudgie automatically updates the knowledge base index when you publish new posts or update existing content. This means the chatbot can stay aligned with your website as it changes.
For active WordPress websites, this is especially important. You do not want your chatbot answering based on outdated pages or old product information.
With auto indexing, ChatBudgie reduces manual maintenance and helps your AI assistant stay current.
How Token Billing Works
ChatBudgie uses tokens to power AI features.
Tokens are consumed when ChatBudgie creates embeddings during indexing and when it generates AI responses for visitor questions.
Instead of requiring you to manage separate accounts with multiple AI providers, ChatBudgie provides unified token billing. This gives you access to leading AI models without dealing with separate API keys, provider invoices, or complicated billing relationships.
ChatBudgie handles the technical AI provider side so you can focus on your website and your visitors.
Why This Workflow Matters
ChatBudgie’s workflow is designed to solve a real problem for WordPress site owners.
Many websites already have valuable content, but visitors do not always know where to find it. A traditional search bar depends heavily on keywords, and menus can become difficult to navigate as a site grows.
ChatBudgie makes your content easier to access by turning it into an interactive AI knowledge base.
The result is a smarter website experience:
Visitors can ask questions naturally.
Your existing content becomes more useful.
Answers are grounded in your own website data.
The chatbot stays updated as your content changes.
You do not need to manage complex AI infrastructure.
Conclusion
ChatBudgie works by connecting your WordPress content with modern AI through a RAG-based workflow.
It scans your posts and pages, breaks them into semantic chunks, creates embeddings, stores a local vector index, retrieves relevant content when visitors ask questions, and uses managed AI models to generate helpful answers.
For WordPress site owners, this means you can turn your website into an intelligent knowledge base without complicated setup or ongoing technical maintenance.
ChatBudgie helps your visitors find answers faster, understand your content better, and interact with your website in a more natural way.